
Easy DIY Gifts That Won’t Hurt Your Bank Account
Want to gift your favourite person something special but you’re on a tight budget? We’ve got you covered with these simple DIY gift hacks!
Updated 16 Dec 2019

Oh no! Your friend’s birthday is near and your sister is going to have her graduation day soon, but unfortunately, you’re on a tight student budget and can’t afford to splurge on expensive gifts. Fret not, we have the perfect solution — DIY gifts. Not only will you save a lot of money but do-it-yourself gifts are actually more meaningful because they require you to put in thought and effort.
Check out these creative DIY gift ideas your family and friends would love!
#1. Chocolate bouquet
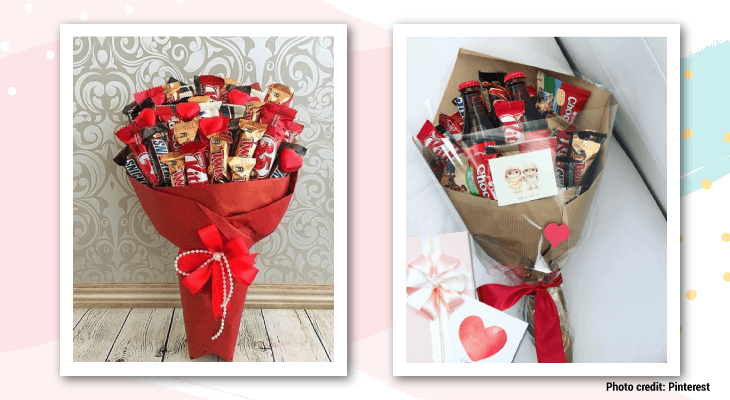
A bouquet of flowers usually costs a lot when you buy it from the store and it is also a common gift. However, now there’s a new trend of bouquets which you can easily make yourself — chocolate bouquets.
Making your own chocolate bouquet is easy and thrifty as all the items needed can be found in your house or at your nearby store. We suggest making a trip to Mr. D.I.Y — it’s the heaven of all DIY things.
What you need:
- Skewers
- A pair of scissors
- Ribbon
- Wrapping paper
- Rice paper
- String
- Clear cellophane tape
- Candy / chocolates
Instructions:
- Once you’ve gathered all the items, attach the chocolates at the ends of the skewers with cellophane tape. Then, tie the skewers together neatly.
- Fold the wrapping paper in half and place it horizontally before folding both ends diagonally. Then, place the tied up chocolates at the centre of the wrapping paper.
- Wrap the paper around the chocolates and secure it with a string around the skewers. Finally, tie a ribbon on top of the string knot to make it look pretty. Tada!
You can also check out other video tutorials for more design ideas.
#2. Scrapbook photo album
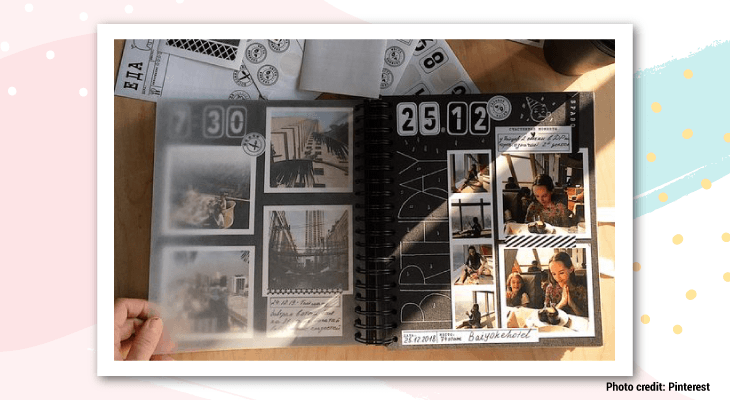
If you’re looking to give a memorable gift, a personalised scrapbook photo album is the way to go.
What you need:
- Cardboard pieces
- Plain card paper and coloured paper
- Tape
- All-purpose glue
- Penknife and ruler
- Wrapping paper / fabric
- Binder rings and hole punch
- Pictures with your loved one
- Decorations (e.g. glitter, cutouts, stickers, washi tape)
Instructions:
- Create a binder base by cutting your cardboard into the size you want for your scrapbook. You will need 2 same-sized pieces (for the front and back of your book) and 1 smaller piece (around 6cm in width) that will act as the binder’s middle.
- Lay the 3 pieces of cardboard side by side (with the smaller piece in the middle). Leave a 1cm gap between the right side of the front cardboard and the left side of the binder's middle. Tape the sides together. Then, tape the left side of the back cardboard to the right side of the binder's middle, leaving the same gap.
- Wrap your binder with wrapping paper or fabric using the glue and scissors. After that, punch holes in the middle of your binder and attach your binder rings. Then, punch 2 holes in the sides of a few sheets of plain card paper and place them in the rings.
- Cut your coloured paper into different shapes (big enough to fit your photos) and glue them to the card paper pages. Glue all the photos you’ve printed onto the different coloured paper shapes. You can even place the photos in pockets or if you want to have a go at being a paper engineer, you can make other pop-up features to place your photos in.
- Decorate the rest of your scrapbook using markers, stickers, beads or anything else you like.
Viola! Your DIY photo album is ready to be gifted. Alternatively, if you find it too hard to make a binder base, you can buy a basic binder or book with blank pages and decorate it.
PRO TIP
Instax camera photos are perfect for scrapbooks! Find out how you can get one for free when you enrol in college.
#3. Scrabble tile picture frame

Remember those Scrabble tiles you always find lying around the house or if you’re lucky enough, they’re probably still packed in the box, untouched. If you’re not planning to play Scrabble any time soon, put these tiles to good use by creating a unique decorative picture frame.
What you need:
- A photo frame
- Cardboard
- Scrabble tiles
- Glue
- Penknife
Instructions:
- Measure the cardboard according to the size of your photo frame and cut it out using a penknife. Then, place it in the frame. Make sure it fits nicely so it won’t fall off.
- Spell out different words on the cardboard, similar to how you would play Scrabble. Choose words that are meaningful such as the receiver's name or you can spell out a short quote.
- Glue the tiles in place and let it dry.
This is the ideal gift if your friend or loved one appreciates all things home decor!
Apply for university with EduAdvisor
Secure scholarships and more when you apply to any of our 100+ partner universities.
Start now#4. Bake goodies
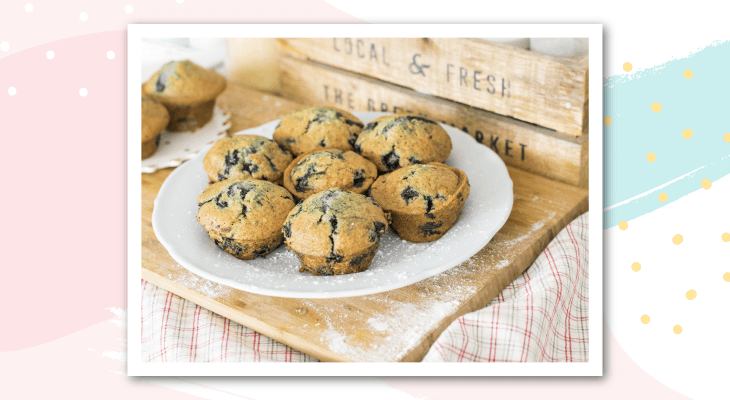
Home-baked dessert as a birthday present? Who wouldn’t like that — it feels closer to home.
Have no idea what to make? Don’t worry, we’ve got your back with this simple muffin recipe.
What you need:
- 2 cups of all-purpose flour
- 3 teaspoons of baking powder
- ½ teaspoon of salt
- ¾ cup of white sugar
- 1 egg
- 1 cup of milk
- ¼ cup of vegetable oil
- Muffin paper cups and tray
Instructions:
- Preheat your oven to 205°C.
- Now, here comes the fun part. Put the flour, baking powder, salt and sugar into a large bowl and mix well. Then, make a well in the centre and put the mixture aside.
- In a small bowl, beat the egg with a fork and stir in milk and oil. Then, pour it into the well of the flour mixture. Mix all of the ingredients lightly and quickly with a fork until the mixture is moistened. Do not beat it hard.
- Place the muffin cups in your muffin tray and pour the batter evenly into them. You can also add flavour to the muffins by adding blueberries, chocolate chips, Nutella or anything else which your loved ones would enjoy eating.
- Once you’re done, bake them in the oven for around 25 minutes. Wait until they give off a golden colour.
When they're ready, your kitchen will be filled with the aroma of freshly-baked muffins and you won't be able to resist them. Package them nicely in a basket or a pretty paper box adorned with a ribbon to create an irresistible gift.

#5. Sharpie mugs
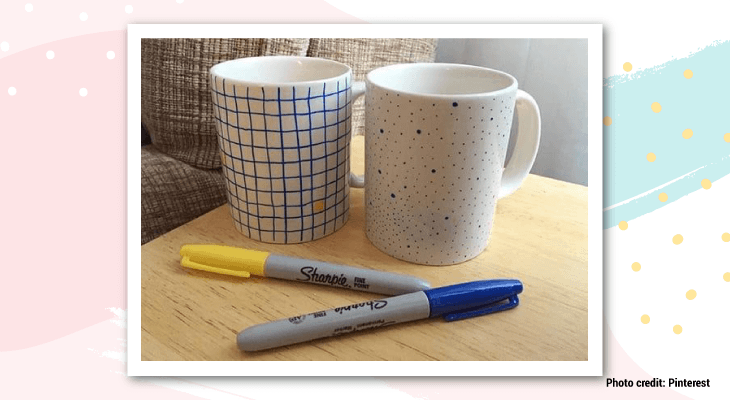
Don’t have time to run to the store and get the items for your DIY gift? Don’t panic just yet. We know of the simplest gift one could ever make — sharpie mugs!
What you need:
- A white mug
- Sharpie pens; one colour would suffice (or you can add more if you’re feeling creative).
Instructions:
- Draw patterns on your mug or write out a quote/name — depending on your creativity. Then, leave the mug out to dry overnight.
- Once you’re satisfied with your design, bake your mug in the oven at 177°C. This is to ensure that that the sharpie ink is absorbed through the mug so that it won’t come off easily.
- Package the mug in a box and wrap it neatly so that it is gift ready.
With all these easy DIY hacks, you don’t have to worry about your budget or wonder what to buy anymore. There’s no doubt that your family and friends would appreciate your meaningful gift laced with thought and effort. So get creative and have fun making them!
Looking for more tips on what you can do to save money? Check out these 7 ways to get things for free.

Inas Syaheedah
I like pineapples on my pizza.